|
Playing the Both-Back Formation
by Kathy Krajco
Operation Doubles
The Both-Back Formation is often played poorly, because few know
its strategic objective. From between the sidelines, the only
winners a Both-Back team can hit are lobs or drop-shots, because
they have none of the vantage points and angles for hitting winners.
So, everybody recognizes this formation as a purely defensive
one. But what is the strategic way to play it?
The Both-Back Strategy requires a different mindset than playing
in the other two formations. It sacrifices the fringes of your
territory to consolidate your forces at the heart. The goal is to
deny the opposition a winner or forced error between the
sidelines. To accomplish that, your team leaves itself open to a
nice angle-shot wide.
Why? Because in this situation your best bet is to just throw
yourselves on the mercy of the odds. By denying the center and
sacrificing the wings, you maximize the quality of the shot it
takes to beat you. Also, since your opponents should be net
players, and since net players target opposing net players with
their volleys, the Both-Back Formation moves you both back to the
baseline, where you're least likely to be passed and least
vulnerable to having an error wrenched from you. It puts you both
in the best position to return anything that stays between the
sidelines except a good drop-volley, which is a high-quality
shot.
Another strategic objective is the offensive. In the Both-Back
Formation you play defense to stay alive for a chance to steal
the offensive. Meanwhile, you make it hard for your opponents to
end the point, except by committing that error you're playing for
or by setting themselves up for the kill.
This is because those sacrificed wings of yours aren't as open as they
seem. The weakness of the Both-Back Formation is a lure into a
trap.
Positioning
Let's look at the three common positioning mistakes both-back
players often make:
Both-Back players often position too wide.
Presumably this is because they think they can position as
wide as when their partner is at net. Not so. Net players cover
more territory than back-players. In fact, they ordinarily cover
more than half their team's court. So, the back-player in the
Up-and-Back Formation can afford to position wide of the singles
sideline, whereas a both-back player cannot. If they did, they'd open
a gap for a winner right down the center of their team's court. As
a result, the opposition's setup shots to the center mark go for
winners.
When playing against the Both-Back Formation, exploit this
mistake by watching for and targeting that gap.
When playing in the Both-Back Formation, avoid this mistake.
You and your partner should position as far apart as possible and
still be able to reach a shot down the center of the overall
Angle of Return. Since your opponents are usually in the Both-Up
Formation, the center of the Angle of Return should be roughly
the center line of the court.
Both-Back players often position at different depths.
When you do that, this side-by-side formation actually becomes
a mini Up-and-Back Formation in the backcourt — one with an
angular hole in the center. The angle of this hole enlarges any
existing gap between partners.
When playing in the Both-Back Formation, avoid this
mistake.
When playing against the Both-Back Formation, exploit it by
angling center shots through that hole.
Both-Back players often position too deep.
Doing so leaves the wings wide open.
When playing against the Both-Back Formation, exploit this
mistake. If your opponents don't stay well behind the baseline
for you, hit penetrating (i.e., deep and heavy) volleys at the
center mark to make them back off and expose their wings. Then
you'll have an opening for a finishing shot almost every time you
hit the ball. And you can increase your margin for error on these
finishing shots by hitting them less hard and angling them less
sharply. Even if your too-deep opponent does reach the ball, your
shot takes them out of the point by drawing them so far off the
court they can't recover in time.
When playing in the Both-back Formation, avoid this
mistake by playing on or inside the baseline. From here you reach
more of the opposition's angle shots. Just as important, from
here you're not drawn so far out of position to play them. Also,
by playing shallow and hitting the ball on the rise, you deny
opposing volleyers two-thirds of what's precious to them —
reaction time. By playing shallow and scrappy, you can make it
hard for your attackers to put the ball away.
When to Play Both-Back
Because the Both-Back Formation has no vantage points or
angles, use it only as a last resort. For instance, don't fall
back into the Both-Back Formation because the opposing receiver
tees-off on your team's serve to blast ballistic returns at your
net player. The problem is your team's poopy serve, not where the
server's partner is. Similarly, don't fall back into the
Both-Back Formation because your opponents tee off on your
back-player's groundstrokes to blast ballistic returns at your
net player. The problem is your back-player's poopy
groundstrokes, not where their partner is. How do you solve these
problems then? Me? I just threaten the poopy partner with worse
than whatever they are afraid of, if they don't quit hitting those
poopy shots. (Just a suggestion.)
When you're both back, any time one of you hits to an opposing
back-player, the other can simultaneously walk up to the net. So,
only the Both-Up Formation can keep you both back. Therefore,
it's hard to imagine a situation in which a team might remain in
the Both-Back Formation while the opposition is in the
Up-and-Back Formation. And it's impossible that a team should
remain in the Both-Back Formation while the opposition is too.
So, the only sensible time to use the Both-Back Formation is
against the Both-Up Formation.
In those rare instances when you find yourselves Both-Back
against a team that is not Both-Up, it is either because you fell
back unnecessarily or because you missed a chance to advance. No
problem. Here's what to do about that:
- How to play Both-Back against the Both-Back Formation: While one of you hits a shot, the other takes the net.
Alternatively, while one of you hits an approach shot, both of
you take the net.
- How to play Both-Back against the Up-and-Back
Formation: As usual, since you are back-players, avoid
hitting to the opposing net player. While one of you hits to the
opposing back-player, the other takes the net. If your advancing
player is on the same side as the opposing net player, your team
can switch-poach the return. Alternatively, if your hitter hits
an approach shot, you both can take the net.
In other words, the way to play Both-Back against these
formations is to NOT play Both-Back. An approach shot is
necessary only when your hitter advances to net. That's
because they will need an easy first volley in no man's land, and
an approach shot draws one. The hitter's partner needs no
approach shot, because they get a head start and make it through
no man's land before the return is back.
Now for the only situation in which you may really need to
play Both-Back: you're under attack and pinned Both-Back by
opponents in the Both-Up Formation. Though this is a difficult
situation, if you understand the Both-Back Formation and know how
to play it, you have a good chance to win the point. In fact you
have no less than three avenues to victory.
Your Three Avenues to Victory
Against the Both-Up Formation you have three
avenues to victory:
You doctor your odds at both ends, both strategically and
tactically, to win the point through an error. By working your
way off the defensive you play for D-day. By springing the Trap,
the Both-Back Formation strikes like a coiled rattlesnake to
score outright.
Let's explore each of these avenues in turn.
Your 1st Avenue to Victory
Getting Along With the Tennis Gods: Doctoring the Odds
Tennis is a game of errors, because errors decide 60 percent
of the points. The Both-Back Strategy minimizes your odds of erring,
while maximizing the opposition's odds of erring. What more could
you ask of a strictly defensive strategy?
Not that this odds-doctoring makes your odds good, but it's a
definite improvement. To maximize your odds, you should also use
error-drawing tactics.
Error-Drawing Tactics to Use Against Net
Players
- To force errors, take advantage of your increased margin
for error when hitting to volleyers: Hit out on the ball,
because volleyers haven't time to judge your hard shots and must
play anything that looks as though it might land in.
- To draw errors and to prevent penetrating volleys, make
volleyers hit up: use touch and dead aim at the tape to make
your shots dip as they clear the net.
- To draw errors, feed a volleyer's bad habits with
occasional underspin: be on the lookout for incoming feeder
shots suitable to chip, chop, or slice.
- Test the opposition to see if they'll hesitate to hit a
shot midway between them.
- Anticipate and make great gets: Statistics show that,
the longer the point, the higher your team's odds of winning it.
So, break your neck to return the opposition's forcing shots and
attempted winners. The idea is to keep the ball in play till you
can hit a forcing shot yourself.
- Lob: The lob is the only shot that targets the Both-Up
Formation's vulnerable area in the rear. It is also the only way
to drive at least one opponent from the net. Just as important
though, lobbing keeps the opposition from crowding the net. You
don't dare let them do that, because crowding the net gives them
horrendous angles and makes it practically impossible for them to
err. Unfortunately, many players lob only when they must. That
is, they lob only when they're stretched out and barely reaching
a shot. Which is why a high percentage of lobs are poor and get
smashed. But don't be a player who lobs only in emergencies. Lob
also when you're not forced to, when you're not expected to. You
hit much better lobs then, and they are unanticipated to
boot.
- To maximize the territory you cover, to maximize the speed
of your shots, and to minimize the opposition's recovery time,
play the ball on the rise from inside the baseline: If your
opponents hit penetrating volleys, doing this will be hard. The
point becomes a contest to see which team has their way over how
shallow the both-back team gets to play.
Playing both-back is closing ranks. Your team gives away the
borderlands to concentrate on defending a smaller area. In that
area your defense is rock solid, making it hard for your
opponents to end the point, even with the most forcing shots. As
a result, their inability to put the ball away often frustrates
them. It at least racks their nerves, because volleyers feel the
percentages slip-sliding away beneath them every time the ball
returns. That's pressure. Frustration and pressure. This may
cause them to overplay their shots and hit short or cough up that
error you're looking for. It may also cause them to become
impatient and go for the finishing shot when they shouldn't.
Despite all this odds-doctoring, your odds still are not good.
That's because it's not so easy to make an unforced error at net.
Therefore, do not play defense to play defense; play defense to
stay alive for your next chance to go on the offensive.
Your 2nd Avenue to Victory
Getting Off the Defensive and Onto the Offensive
The offensive is a strategic objective because it enables you
to force an error or knock at least one opponent off the net so
at least one of you can take the net.
In tennis, offense and defense are relative
terms. At almost any moment, each player or team is playing a
blend of each. All too often, strokes are labeled as "offensive"
or "defensive" by their names. Nevertheless, volleys and even
overheads are sometimes hit defensively. Though the net is the
best position from which to offend, it's not the only one. Many
great backcourt singles players play offensively and are even
more aggressive than some net rushers. In the Both-Back
Formation, you need to take a lesson from them.
What counts are your chances of winning the point, not your
chances of making the next shot. So, while the worst thing you
can do is take unnecessary risks, the next-worst thing you can do
is fail to take calculated risks. If you hit a
just-get-the-ball-back shot, you're almost certainly going to
lose the point. So, your odds are actually better if you raise
the level of your play and try to do some damage with your
shots.
Seldom can you seize the offensive against a Both-Up team with
a single stroke. You must work your way onto the offensive in a
series of shots from the backcourt. Thus you fight your way back
over previously lost ground. Think of it this way: In a tennis
match the contestants relate to each other through the shots they
exchange. That relationship is like a teeter-totter. When your
team is on the offensive, the balance of power is tipped your
way, and you have the leverage of the upper hand.
So, when you're on the defensive, refuse to yield to your
opponents' strokes. That is, refuse to hit off the back
foot. Answer with the most formidable returns you can.
You want to level that teeter totter. It's like Sumo Wrestling or
arm wrestling or football line play: once the opposition
penetrates to start driving you backward, they're gaining
overwhelming momentum. Your aim is to get back on an even
footing. Once you've accomplished that you've neutralized the
force of your opponents' attack.
Now you're in position and reaching shots in good shape. Now
you're hitting off the front foot and from a balanced pose, so
your point of contact with the ball is in the optimum strike
zone. Now you're able to hit more forcing and tricky shots.
So do. Use them to cultivate chances to go on the offensive.
Such chances typically arrive as a short shot.
The Short Shot
Most forcing shots and winners from baseline
play are returns of a short shot. About one in every three
incoming shots will be short. If that next short shot lands
between the sidelines, it gives you two options:
- Option #1: You're probably in good shape to stroke an
offensive lob. The object is either to win the point outright or
to drive one of your attackers from the net. If this lob drives
one of your opponents from the net, there's nothing to keep your
partner in the backcourt. What's more, this lob serves as an
excellent approach shot. So, either one or both of you should
take the net behind it.
- Option #2: You can tee-off on this short shot to fire
a bullet at your attackers. The object is either to force an
error or to drive them back a little. As they give ground, you
advance. If you drive them back into the rear third of their
forecourt, consider taking the net.
If, however, that short shot is wide of the sidelines, lick
your chops. The opposition has made the Big Mistake: they have
given you a vantage point and an angle. They have also drawn you
out of position though. So it's surely time to end the point:
spring The Trap.
Your 3rd Avenue to Victory
Springing the Trap
When a back-player reaches a Both-Up team's attempted
finishing shot — an angle volley — the back-player
has the Both-Up team in Catch-22. You may take your pick of five
lethal returns. They are shown in the diagram below.
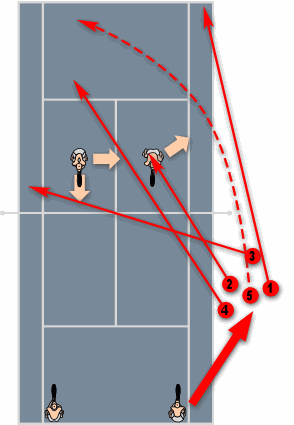
Lethal Return #1 —
Down-the-Line Passing Shot From Outside the Net Post: When
available, this is usually your best option. You can make this
shot even when you're stretched out. It goes around (rather than
over) the net, so you can slap it to skim it unplayably low. The
down-the-line opponent should shift laterally to cover this
return, but even if they do, you hit from so far wide they can
hardly reach your shot.
Lethal Return #2 — Bullet at the Down-the-Line
Opponent: You hit at this opponent because they are the nearer
opponent, the one with less time to react. You'd have to hit
harder to deliver the crosscourt opponent a shot
too-hot-to-handle. To make this return, you must reach the ball
in good shape. Since you hit over a high point of the net, it can
be a low percentage shot and therefore a poor choice.
Nevertheless, it's a sensible choice when you can contact the
ball high and hit from close range. Then you needn't hit hard to
get the job done.
Lethal Return #3 — Net-Skimming Dink Angled Sharply
Crosscourt: The finesse shot. The shot that flies east-west
on a court that runs north-south. If the volley you chase down is
sharply angled, you have a shot at this cunningly angled return.
Many doubles players have a poor eye for the angles, so they fail
to see the angle you have and leave themselves way out of
position for it. In fact, I've seen people so stunned by the
angle of this shot that they don't even chase it.
Whereas some openings are smaller than they look, this opening
is bigger than it looks. It's biggest when your crosscourt
opponent hangs deep in their forecourt. It's an easy shot, so easy
you don't have to get to the ball in good shape. It barely clears
the low point of the net at an unplayable angle. When you've hit
it a few times, the opposition starts looking for it. Then you
can get nasty by just eyeballing it to make your opponent
anticipate it and crowd the net. That's great, because they thus
opens a hole in their team's formation that you can hit Lethal
Return #4 through, instead.
Lethal Return #4 — Through the Hole: In this
situation the down-the-line opponent usually sees the danger of
Return #1 and reacts by shifting laterally. If their partner
doesn't sag, the shift opens a gap in your opponents' formation.
This gap enlarges to become a hole if your opponents position at
different depths. So you may have an angle for a shot through a
sizable opening, especially if (a) your down-the-line opponent
shifts laterally and backward for fear of Return #1, and/or (b)
your crosscourt opponent fails to sag and crowds the net for fear
of Return #3.
Lethal Return #5 — Short-Range Offensive Lob:
This is a little lob. It's just high enough to clear the
opposition's overhead. You hit it from close to the net, so it
gets over the other team and comes down quickly. Especially if
you apply topspin (so the ball bounds away instead of bouncing
straight up), neither opponent will be able to run back for it in
time. This shot works best when you disguise it. So take a full
backswing, making it look as though you intend to drive the ball.
You can place this lob anywhere deep in the opposition's
court.
And so, if you play shallow, your unprotected wings are not as
unprotected as they look; they lure your opponents into this
trap. Both-up players can hardly resist the temptation to go for
angle-volley winners when they shouldn't. And when you make the
get, they get burnt.
One more thing. Angle volleys draw you forward and wide to
play them, and your opponents return your shots as volleys from
the net. So when you return an angle volley, you won't have time
to recover. Since you've been drawn out of position, yours
is now the team that wants to end the point. You must go for a
finishing shot. Unload one of these five lethal returns on every
angle volley you chase down.
Final Analysis
Whenever your team is in the Both-Back Formation, look for a
chance to get at least one of you into the forecourt. If you pass
up opportunities to do so, you're not playing the odds for all
they're worth. You're putting all your eggs in one basket —
the Error Bag — and making no use of additional means to
tilt the odds more your way.
The Both-Back Formation is good for what it's for. Yet it's
good for nothing to a team that makes any of the following
mistakes.
Cardinal Mistakes:
- falling back into the Both-Back Formation unnecessarily
- letting a shot pass between partners
- passing up opportunities to hit forcing shots and go on the
offensive
- failing to unload a finishing return on every angle volley
reached
As for letting the ball come between you and your partner:
never let any third party come between you and a partner. Whack
it. Whenever you let a shot pass between you, Both-Back Strategy
has failed, because the winner that passes between you is not a
quality shot. All it is is embarrassing. So you lose more than
the point when you lose it that way. If you both swing, the
racket in front will hit the ball. That's all. Any knocking of
racket heads almost never affects the shot. As for your rackets,
most of us knock them around worse than that twenty times a day.
So the gods — that is, the odds — are with you if you
swing.
Review of Key Points
- In the Both-Back Formation your team has no strategic vantage
points or angles, and court coverage is at a minimum.
- Give ground grudgingly, and do not fall back into the
Both-Back Formation unnecessarily.
- While in the Both-Back Formation, look for a chance to get
into the Up-and-Back Formation or the Both-Up Formation.
- To advance, only your hitter needs to follow an approach
shot. Your hitter's partner can advance on any shot to an
opposing back-player. So, only the Both-Up Formation can pin you
Both-Back.
- The Both-Back Formation sacrifices the wings of your
territory to concentrate your defenses within the sidelines, thus
increasing the level-of-difficulty of the shot it takes to beat
you.
- Often there's a surprise gap in the center of the Both-Back
Formation.
- Never let a shot pass between you and your partner. When in
doubt, swing.
- When playing in the Both-Back Formation, play as shallow as
possible. When playing against the Both-Back Formation, drive
your opponents deep by hitting penetrating setup shots to the
center mark.
- Doctor your odds on both ends: Force errors. Draw errors.
Play the percentages.
- Work your way onto the offensive.
- Do not let yourself be drawn out of position by angle
volleys. Instead, spring the Trap by hitting a lethal
return.
- Don't forget to lob.
Kathy Krajco runs the website Operation Doubles: Tennis Doubles Strategy & Tactics.
If you wish to provide a comment to the author of this Wild Cards column, please use this form. Tennis Server will forward the comment to the author.

Wild Cards Archives:
1998 - 2003 | 2004 - Present
If you have not already signed up to receive our free e-mail
newsletter Tennis Server INTERACTIVE, you can sign up here.
You will receive notification each month of changes at the Tennis
Server and news of new columns posted on our site.
|
This column is copyrighted by the author, all rights reserved.
|
 |
 You will join 13,000 other subscribers in receiving news of updates to the Tennis Server along with monthly tennis tips from tennis pro Tom Veneziano.